


In this series, we have explored constructing an NBA roster as an example use case where an organization has to optimally allocate resources. In the first part, we introduced the topic of optimization in an enterprise context and began building an end-to-end solution with data exploration and predictive analytics. In the second part, we introduced the Knapsack Problem and implemented a solution using Python. We will now explore how to package such a code-based solution into a nifty user interface for others to use in Dataiku.
Helpful Context
As we have discussed in the previous articles of this series, optimal resource allocation is a common problem that arises in enterprises, particularly those looking to take a data-driven approach to decision-making. While optimization can be useful in a variety of contexts, including logistics, manufacturing, and human resources, we have focused our attention on a key sports use case. Specifically, we look to construct the most efficient lineup of NBA players on a given night, subject to limitations on salary, positions, availability.
In the first part, we built a predictive model to determine how many fantasy points (a combination of statistics like points, rebounds, assists, steals, blocks, and turnovers) a player will score on a given night. The goal is to use this predicted value as a proxy for that player’s productivity in the Knapsack Problem.

In the second part, we covered how to actually solve this linear optimization problem using a Python library such as CVXPY. First, we set up an objective function (the sum of points scored by our lineup), salary constraints (the total salary of the lineup), and positional constraints (limitations on the number of players allowed at each position in the lineup). Once we set up the problem, we were able to use CVXPY to construct a roster that would maximize the point output while adhering to the constraints.
While it is useful to be able to build custom code to solve problems like the Knapsack Problem in Dataiku, taking this approach when collaborating with other users on enterprise-level problems can pose challenges. For example, if other users are not comfortable with the language in which the solution was developed or if there is a lack of documentation, it can be difficult to figure out how code works or how it can be used to solve more general problems.
Furthermore, a typical team in a data-driven organization often consists of both technical users, or coders, and non-technical users, who prefer to work with low or no code. If a coder solves a problem and wants to share this solution with the rest of the team, non-coders may not be able to modify parameters and run the code themselves. The potential lack of clarity, generalizability, and configurability in these situations can be addressed in Dataiku by plugins.
Let's Back Up: What Is a Plugin?
Plugins allow Dataiku users to wrap code-based solutions in a visual interface, so that non-coders can leverage these solutions without having to write any code themselves. Through descriptions in the visual interface, plugin developers can make it easy for a new user to understand what the plugin does. Plugin developers can also provide configurable fields to allow a user to input specific parameter values when they use the plugin. This allows non-coders to have control over how the plugin is being used to solve their specific problem, which may differ slightly from the original problem being tackled by the coder.
A plugin consists of one or more components, each of which serve a specific function. Plugin components can take a variety of forms, including a custom recipe, a step in a Prepare recipe, a dataset exporter, a custom Visual ML model, and much more. For the purposes of this article, we focus our attention on the type of component that is most commonly used in a plugin: a code recipe. Specifically, we will wrap the code we wrote to solve the Knapsack Problem into a plugin component that we can use in our flow.
Configuration of the Plugin Component
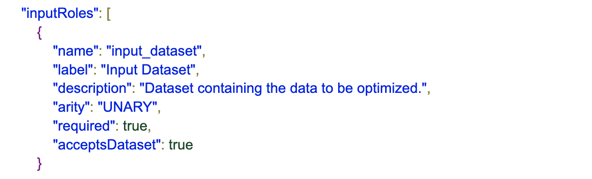
The first piece that needs to be written for a plugin component is the configuration. This is a JSON file that provides information about the plugin, including metadata, input and output datasets, and parameters. The following is an example of what the metadata might look like for our problem:

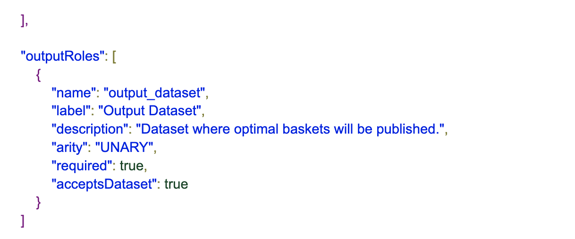
This includes a name, description, and icon for the component, the latter of which can be selected from a gallery of icons. Next, in the configuration file we include input and output datasets:
Finally, we include a list of user-defined parameters for the plugin component. These parameters can take a variety of forms, including direct input that can be typed by the user, a list of columns that can be selected by the user, and more. Here is an example of what a list of parameters looks like in the json file:
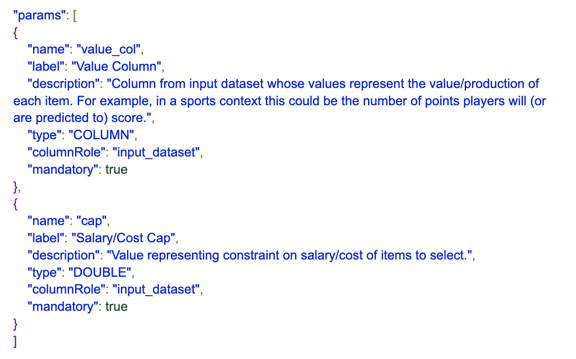
In addition to a column representing player predicted value, we also add parameters to allow the user to select columns in the input dataset representing player labels, costs, actual values (if known), and an aggregation column (if the user would like to perform the optimization for a custom period). In addition to cap, we also add two other parameters that the user can input directly: selection_n (the number of players that need to be selected) and top_n (return the “N” best lineups rather than just the best one).
Code Implementation of the Plugin Component
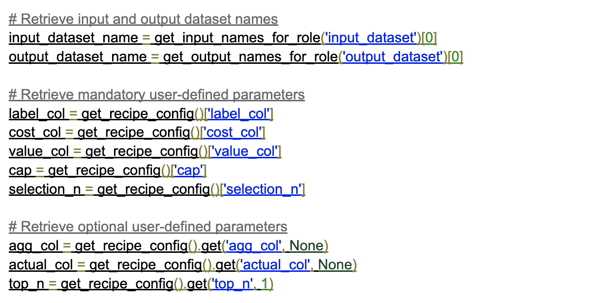
Next, we must include a requirements.txt file which lists all of the Python libraries used by the plugin. This allows us to attach an environment to the plugin so that if this plugin is ever installed or uploaded by someone else to a new instance, they can use it without having to worry about creating a code environment manually. Once we have specified the modules required by the plugin, all that remains is to write the meat of the plugin component: Python code which incorporates configuration variables and implements the code recipe. To do so, we create a Python file which first assigns the input and output datasets as well as the parameters specified in the configuration to variables that can be used by the code recipe:
After assigning these variables, we simply need to paste the code from the original Python recipe we are looking to package into the plugin component, which we covered in part two.
Knapsack Plugin
Our knapsack plugin is now complete. A user can use our knapsack optimizer to suit their own needs without having to write any code. The visual interface they will be presented with is much cleaner than a block of code:

In order to make use of this plugin, the user simply needs to enter values for each field and click the Run Button. Because we implemented the plugin to be configurable, one could make use of this plugin to solve problems beyond the realm of sports. In general, they could use it to optimize for the best basket of items given predicted values of these items and a cap on each item’s cost. If we so desired, we could generalize this plugin even more so that the user can add other constraints.
As you can see, plugins are a powerful tool in Dataiku for fostering collaboration on enterprise-level projects. Using plugins addresses the major problems that many organizations encounter when relying entirely on code to solve problems: lack of clarity, configurability, and generalizability. If you want to extend the power of Dataiku with your own datasets, recipes, and processors, be sure to check out Dataiku's vast plugin library.