


This tutorial provides a very basic, step-by-step example of batch scoring a machine learning (ML) model with scikit-learn, Docker, and Kubernetes. We’ll start with a basic Python example, dockerize our scoring code, and schedule our scoring on Kubernetes. I want to get you up and running quickly. But if you want to go even faster, I conclude this post by showing the same example in Dataiku, which makes batch scoring ML on Kubernetes fast and easy.
Time to Score Records
In a previous tutorial, we went through a basic example of training an ML model with scikit-learn, Docker, and Kubernetes. We didn’t go through that trouble for nothing. We trained the model so we could use it to make predictions. The process of making predictions is called scoring. That’s what we are going to do now.
Batch Scoring
What we are going to do is score a bunch of records on some time interval, like every hour or every day. In a future tutorial, we’ll score individual records in real time. But for now, we’ll start with a big ‘ole block of records that we want to score every day.
What You Need
- Python: I’ll be using Python3 (you only need this for testing outside of Docker)
- Docker
- Kubernetes Command Line Tool
- A Running Kubernetes cluster
- You can run these examples with minikube.
- More advanced users can try managed Kubernetes clusters from the various cloud providers
Basic ML Warning
The machine learning presented in this tutorial is quite basic. This is intentional — I want you to focus on learning Docker and Kubernetes.
Basic ML Scoring With Python
We’ll use the model we trained previously to score records, i.e., to make predictions.
Batch Scoring Code
I’m working inside the same directory as before. I create a new Python script called batch.py using vim. Paste in the following code:
#batch.py
from sklearn import datasets
from joblib import load
import numpy as np

X, y = datasets.load_iris(return_X_y=True)
clf = load('svc_model.model')
preds = clf.predict(X)
print ("Predictions: ")
print (preds)
np.savetxt('predictions.csv',preds, delimiter=',')
So let’s break this down a little bit. The core piece is just loading the trained model and then calling a built-in function to score some records:
clf = load('svc_model.model')
preds = clf.predict(X)
To keep things as simple as possible, I use the same dataset for scoring as we used to train the model, e.g., load_iris(). This is not a realistic example, but I don’t want the ML to get in the way of the bigger picture.
Finally, I save the scored records (predictions) to a CSV file using np.savetxt. This way we can use our predictions.
Great. Let’s now test our code.
If you haven’t activated your virtual environment, make you do so, e.g., source env/bin/activate. Then, execute the script. You should see the predictions printed to the console:
$ python batch.py
Predictions:
[0 0 0 0 0 0 0 0 0 0 0 0 0 0 0 0 0 0 0 0 0 0 0 0 0 0 0 0 0 0 0 0 0 0 0 0 0
 0 0 0 0 0 0 0 0 0 0 0 0 0 1 1 1 1 1 1 1 1 1 1 1 1 1 1 1 1 1 1 1 1 1 1 1 1
 1 1 1 2 1 1 1 1 1 2 1 1 1 1 1 1 1 1 1 1 1 1 1 1 1 1 2 2 2 2 2 2 1 2 2 2 2
 2 2 2 2 2 2 2 2 2 2 2 2 2 2 2 2 2 2 2 2 2 2 2 2 2 2 2 1 2 2 2 2 2 2 2 2 2
 2 2]
Basic Job Scheduling With Cron
Before we move to Docker and Kubernetes, we should schedule this script to run using cron. Cron is just a software tool that lets us schedule jobs. One example might be running this Python script every day at 4 a.m. Let’s set that up now.
Note: If you’re running Windows, the cron equivalent is called Task Scheduler. I’m only showing the example for cron. If this means I’m biased in favor of Linux or Mac users, I’m sorry I’m not sorry.
We interact with cron by writing a cron file. Cron calls these crontabs, or cron tables. We can open a cron table by typing:
crontab -e
This opens up a text editor. Paste the following:
SHELL=/bin/bash
0 4 * * * source /Users/gcavanaugh/workspace/k8s_basics/env/bin/activate && python /Users/gcavanaugh/workspace/k8s_basics/batch.py
The second line starts with 0 4 * * *. This is how we tell cron when to run our job. Crontab.guru is a fun interactive tool for generating different cron commands based on when you’d like your job to run.
Important: Be sure to replace my hard coded file paths with your own:
0 4 * * * source <path/to/your/virtualenv/env/bin/activate> && python <path/to/your/code/dir/batch.py>
Python Changes
We’ll also make two quick updates to our batch.py file.
Add the following above X, y = datasets.load_iris(return_X_y=True)
import os, sys
os.chdir(sys.path[0])

from datetime import datetime

fname = "predictions_" + datetime.now().strftime("%Y_%m_%d-%I_%M_%S_%p") + \
        ".csv"
We’re doing two things. First, cron doesn’t execute from the same working directory as we use when running our Python script. So we can use a little Python trick - sys.path[0] - to get the working directory of the Python executable. We hardcoded this in our crontab.
Second, we change the file name. Instead of plain-old “predictions.csv,” we use the datetime module to add the full date and time to the file name. An example output for a cron job running every minute could be predictions_2020_12_21-11_48_03_AM.csv
Our complete script now looks like this:
from sklearn import datasets
from joblib import load
import numpy as np

import os, sys
os.chdir(sys.path[0])

from datetime import datetime

fname = "predictions_" + datetime.now().strftime("%Y_%m_%d-%I_%M_%S_%p") + \          ".csv"

X, y = datasets.load_iris(return_X_y=True)
clf = load('svc_model.model')
preds = clf.predict(X)
print ("Predictions: ")
print (preds)
np.savetxt(fname,preds, delimiter=',')
Now let’s put this in a container.
Basic ML Scoring With Docker
In this section, we will build a Docker image and create a scheduled deployment of our batch scoring job. After we build the image, you can skip ahead to Kubernetes if you are feeling more comfortable with Docker.
Create New Directory
To keep things cleaner, I’m going to create a new subdirectory for our batch job. I’ll also copy the batch.py and svc_model.model (our script and model) into the new directory:
$ mkdir batch
(env)$ cp svc_model.model batch.py batch/
Right now my working directory looks like this. Note that the new directory batch is now present:
ls -l
-rw-r--r--  1 gcavanaugh  staff    74 Dec 16 21:15 Dockerfile
drwxr-xr-x  5 gcavanaugh  staff   160 Dec 22 10:11 batch
-rwxr-xr-x  1 gcavanaugh  staff   408 Dec 21 11:45 batch.py
drwxr-xr-x  6 gcavanaugh  staff   192 Dec 16 20:35 env
-rw-r--r--  1 gcavanaugh  staff  3750 Dec 21 11:14 predictions.csv
-rw-r--r--  1 gcavanaugh  staff  3750 Dec 21 11:46 predictions_2020_12_21-11_46_04_AM.csv
-rw-r--r--  1 gcavanaugh  staff  3750 Dec 21 11:47 predictions_2020_12_21-11_47_02_AM.csv
-rw-r--r--  1 gcavanaugh  staff  3750 Dec 21 11:48 predictions_2020_12_21-11_48_03_AM.csv
-rw-r--r--  1 gcavanaugh  staff  3750 Dec 21 09:58 preds.csv
-rw-r--r--  1 gcavanaugh  staff  5580 Dec 16 21:20 svc_model.model
-rw-r--r--  1 gcavanaugh  staff   230 Dec 16 21:06 train.py
-rw-r--r--  1 gcavanaugh  staff   335 Dec 17 16:43 train.yaml
I’ll cd into batch where I copied my script and model. My directory structure looks as follows:
$ cd batch
(env)$ ls -l
-rwxr-xr-x  1 gcavanaugh  staff   408 Dec 22 09:53 batch.py
-rw-r--r--  1 gcavanaugh  staff  5580 Dec 22 09:53 svc_model.model
Create Dockerfile
Now let’s create our Dockerfile. I’ll use vim, e.g., vim Dockerfile. Paste in the following:
FROM jupyter/scipy-notebook
COPY batch.py .
COPY svc_model.model .
RUN python3 batch.py
As in the model training example, we’ll use the jupyter/scipy-notebook as our base image. We’ll copy in both our script and model. And finally, we’ll specify our RUN command which simply executes our script.
Please remember — this is a “quick and dirty” Dockerfile. We are sacrificing some completeness and correctness to keep things simple.
Build and Run Docker Image
Now that we’ve created our Dockerfile, let’s build our Docker image and test it.
docker build -t batch-sklearn:0.1 .
I named my image “batch-sklearn” with version number “0.1”. You can choose to customize the name and version of your image. Now let’s run the image as a container to test it.
docker run -it batch-sklearn:0.1 /bin/bash
We’ll run the image in interactive mode, passing in /bin/bash as before. This gives us a running shell in the container, which we’ll use to verify that our predictions file is present.
Now we can just run ls to list out the directory within the container.
(base) jovyan@0de249cf611b:~$ ls
batch.py  predictions_2020_12_22-03_11_21_PM.csv  svc_model.model  work
Excellent. The CSV file with our predictions is present. We can conclude our container is working. Now let’s schedule a recurring job.
Schedule Docker Run
Scheduling docker containers with cron is a little tricky. We can run cron inside of our container, but it is not a simple operation. In fact, I view this as one motivating example where a container orchestration tool like Kubernetes becomes very useful. So let’s go right to that.
Basic ML Scoring With Kubernetes
Tag and Push Image
I’ll follow the same pattern as in the previous tutorial. I’ll tag my image with my Docker Hub repository name and then push the image. First, I tag the image:
docker tag batch-sklearn:0.1 gcav66/batch-sklearn:0.1
Then, I push it to Docker Hub:
docker push gcav66/batch-sklearn:0.1
Create Kubernetes Job
Now we can create our Kubernetes job. Create a new file called batch.yaml. Paste the following:
apiVersion: batch/v1beta1
kind: CronJob
metadata:
  name: score-cron
spec:
  schedule: "* * * * *"
  jobTemplate:
    spec:
      template:
        spec:
          containers:
          - name: batch-container
            imagePullPolicy: Always
            image: gcav66/batch-sklearn:0.1
            command: ["python3",  "batch.py"]
          restartPolicy: Never
      backoffLimit: 0
This file should look very similar to the YAML file we created in the previous tutorial to do our model training. There are two key differences.
We now specify kind: CronJob, rather than kind: Job. We also pass in a schedule with the spec. This schedule is slightly different from the cron job we ran locally. To make testing easier, I used the following cron schedule “* * * * *”. This just means our job will run every minute.
Run Kubernetes Job
We execute the job as before, e.g., kubectl create -f <yaml file>
kubectl create -f batch.yaml
View Output
We can check the status of our individual jobs. Our CronJob will create individual Kubernetes jobs (which in turn each run inside of Kubernetes pods). We view the status of the jobs with kubectl get jobs. Here, I’ve added the flag -w, which means watch. This will show the jobs we are creating without having to rerun the get jobs command. See the example from my local minikube cluster below:
$ kubectl get jobs -w
NAME           COMPLETIONS   DURATION   AGE
train-ml-k8s   1/1           6s         4d18h
score-cron-1608653820   0/1                      0s
score-cron-1608653820   0/1           0s         0s
score-cron-1608653820   1/1           8s         8s
score-cron-1608653880   0/1                      0s
score-cron-1608653880   0/1           0s         0s
score-cron-1608653880   1/1           4s         4s
score-cron-1608653940   0/1                      0s
score-cron-1608653940   0/1           0s         0s
With some jobs running, we should next check the actual pods. As before, I’ll run kubectl get pods and I’ll pass in the -A flag to signify all Kubernetes namespaces. I haven’t introduced the concepts of namespaces yet, but if you stick with me on future Kubernetes tutorials I promise we will. The example from my cluster below:
$ kubectl get pods -A
NAMESPACE     NAME                               READY   STATUS      RESTARTS   AGE
default       score-cron-1608653820-vcxjq        0/1     Completed   0          2m47s
default       score-cron-1608653880-s982n        0/1     Completed   0          107s
default       score-cron-1608653940-nvpfj        0/1     Completed   0          47s
kube-system   coredns-66bff467f8-5lvpb           1/1     Running     4          184d
kube-system   coredns-66bff467f8-nm4s7           1/1     Running     5          184d
kube-system   etcd-minikube                      1/1     Running     4          184d
kube-system   kube-apiserver-minikube            1/1     Running     4          184d
kube-system   kube-controller-manager-minikube   1/1     Running     8          184d
kube-system   kube-proxy-64dst                   1/1     Running     4          184d
kube-system   kube-scheduler-minikube            1/1     Running     8          184d
kube-system   storage-provisioner                1/1     Running     8          184d
Now let’s check the logs of one of the completed pods (from above). Select one of the completed pods and run kubectl logs <pod-name>. Below is an example with one of my pods:
$ kubectl logs score-cron-1608653880-s982n
Predictions:
[0 0 0 0 0 0 0 0 0 0 0 0 0 0 0 0 0 0 0 0 0 0 0 0 0 0 0 0 0 0 0 0 0 0 0 0 0
 0 0 0 0 0 0 0 0 0 0 0 0 0 1 1 1 1 1 1 1 1 1 1 1 1 1 1 1 1 1 1 1 1 1 1 1 1
 1 1 1 2 1 1 1 1 1 2 1 1 1 1 1 1 1 1 1 1 1 1 1 1 1 1 2 2 2 2 2 2 1 2 2 2 2
 2 2 2 2 2 2 2 2 2 2 2 2 2 2 2 2 2 2 2 2 2 2 2 2 2 2 2 1 2 2 2 2 2 2 2 2 2
 2 2]
Excellent. We can see the print statement showing our completed records. This isn’t a production example by any means, but you’ve now successfully deployed a batch scoring job on Kubernetes using cron. As a final (optional) step, you might want to delete the Kubernetes cronjob we created:
$ kubectl delete -f batch.yaml
cronjob.batch "score-cron" deleted
What Next
This is a very, very basic example of batch scoring with Kubernetes. If we had lots of users each running lots of jobs, this type of approach would get very messy. Open source projects like Airflow, Argo, and Kubeflow (to name just a few) can be used to help teams manage their workflows (like batch scoring). In a future tutorial, we’ll cover how to set up MLflow and Kubeflow for scalable model training and serving.
Of course, Dataiku can help here too. Dataiku has a built-in scheduler so lots of users can run lots of jobs. It’s secure so IT is happy, and users don’t have to write code or YAML files — they can just use the Dataiku GUI, so users are happy too. Let’s recreate our workflow from this tutorial, scheduling our batch scoring job on Kubernetes.
How to Schedule Batch Scoring on Kubernetes With Dataiku Right Now
As we saw in the last tutorial, Dataiku makes it dead simple to do ML training on Kubernetes. In this example, we’ll now do the same for our ML scoring task. In addition, we’ll use Dataiku’s built-in scheduler to create our scheduled job without messing with pesky cron or Kubernetes directly.
I’ll login to my Dataiku instance and open up the same project we used last time.
1. Create Python Script
I’ll create a new Python script (recipe in Dataiku parlance) and upload our code.
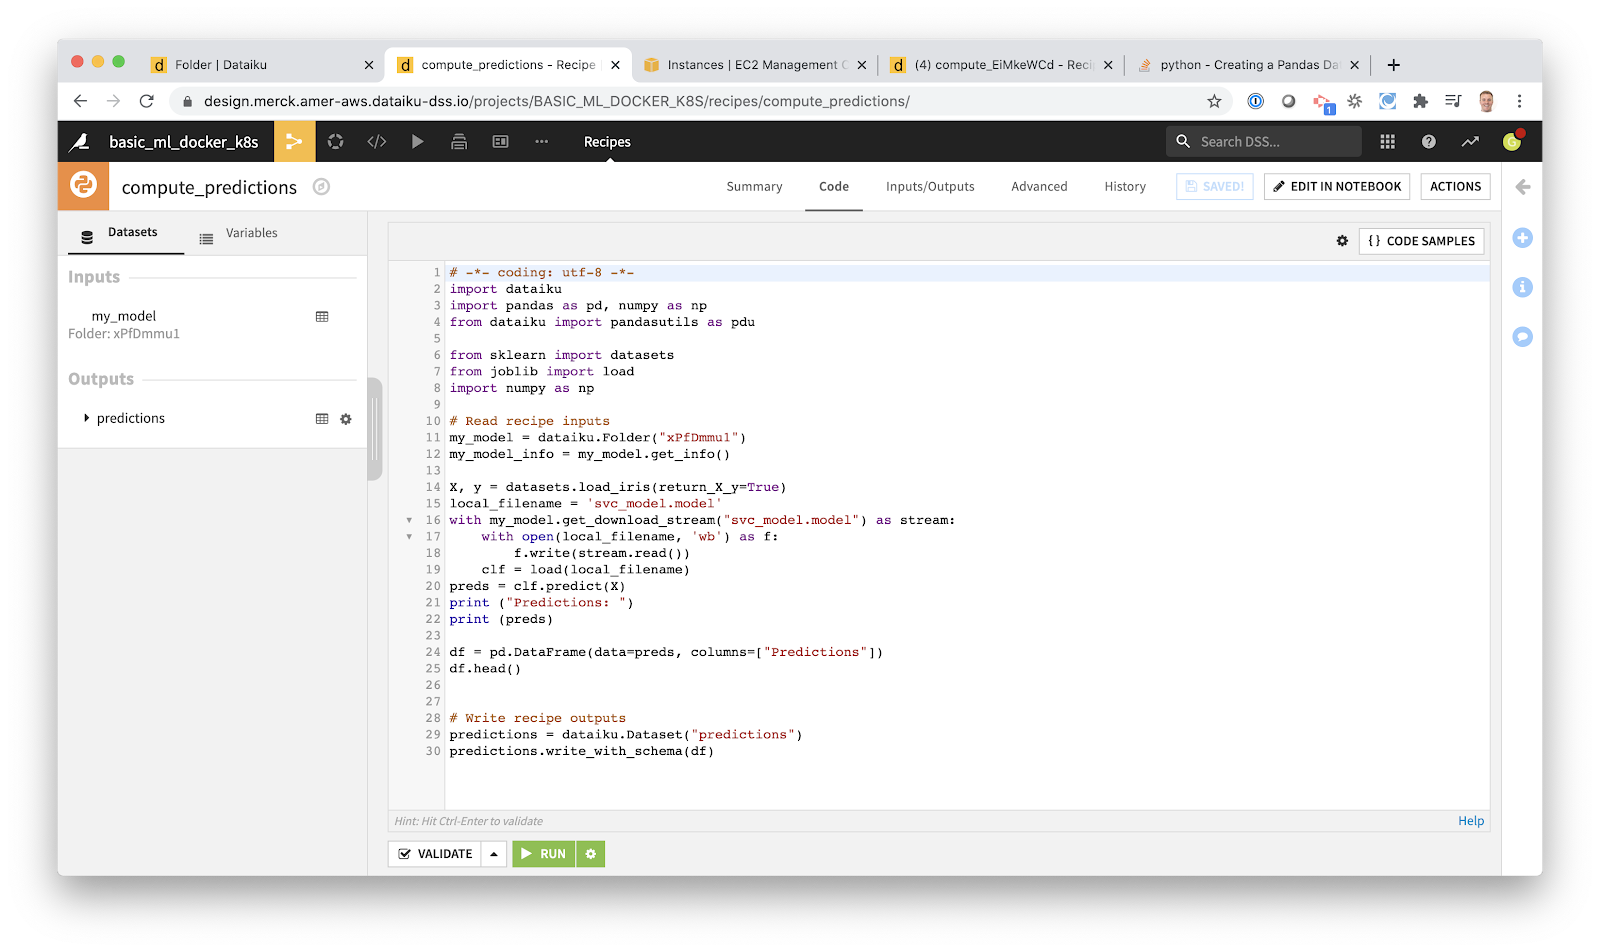
Now, I’ve made some slight modifications. Specifically, instead of reading our saved model from the local filesystem, I use the Dataiku API to read the model from a Dataiku Managed Folder. The reason I did this is because I stored the model in an S3 bucket rather than on the filesystem of the server hosting the Dataiku application. Using cloud storage like S3 is a good idea, but it’s not the focus of this tutorial so I’ll skip over it for now.
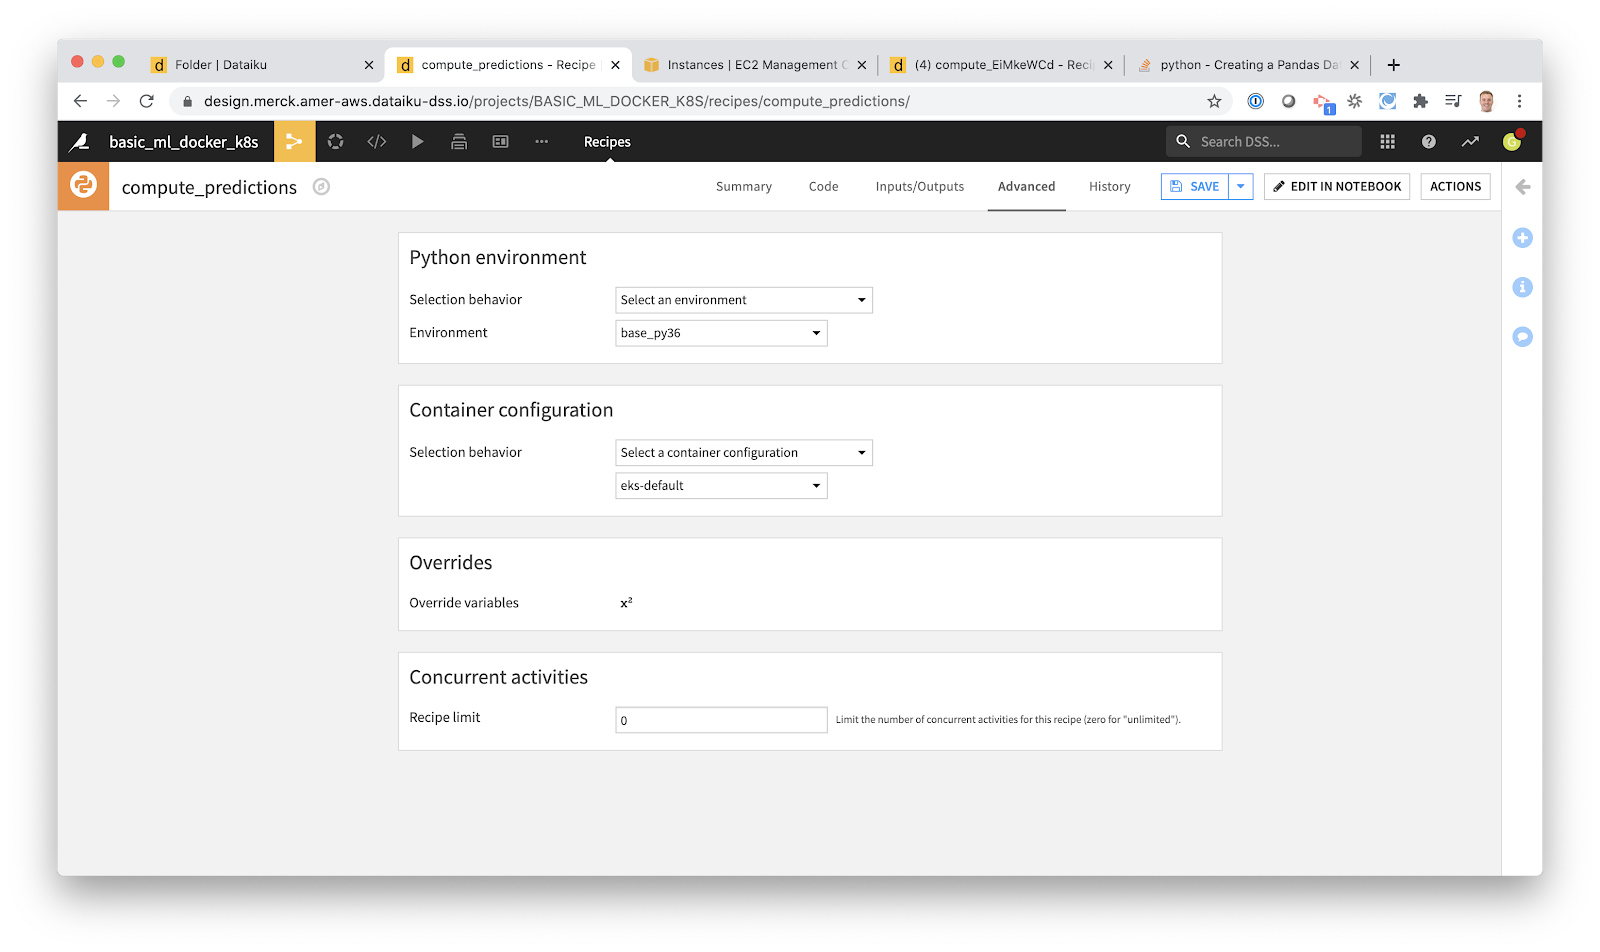
2. Build Docker Images and Create Kubernetes Job
Rather than writing Dockerfiles, building images, and writing YAML files, we can just let Dataiku do it for us. All I have to do is choose an existing configuration:
3. Test Script
Now I’ll test the script by just clicking the “Run” button:

Excellent — we can see that our job succeeded. What we now have is the beginning of a pipeline. If I jump back to the Dataiku Flow, I can see this pipeline:

Not too shabby! Let’s explain each piece in order (1-4 from left to right).
- The first orange circle: The first Python script that trains our model.
- The blue folder: The serialized model is saved in a folder called “my_model”.
- The second orange circle: The second Python script is the scoring code we just copied and ran.
- The blue square: The output is a CSV file with our predictions (the blue box labeled “predictions”).
It’s a story for another day, but that logo on the blue box means that the data is stored in S3. And I’ll just note that we didn’t have to do anything with boto3 to accomplish that — Dataiku has a native connector. It’s cool stuff, but not our focus. Let’s move on to creating our scheduled job.
4. Create Scheduled Job
In Dataiku, we don’t need to use cron or mess with Kubernetes cron jobs. Instead, we can use a simple but powerful GUI for building scheduled jobs. Dataiku calls these Scenarios.
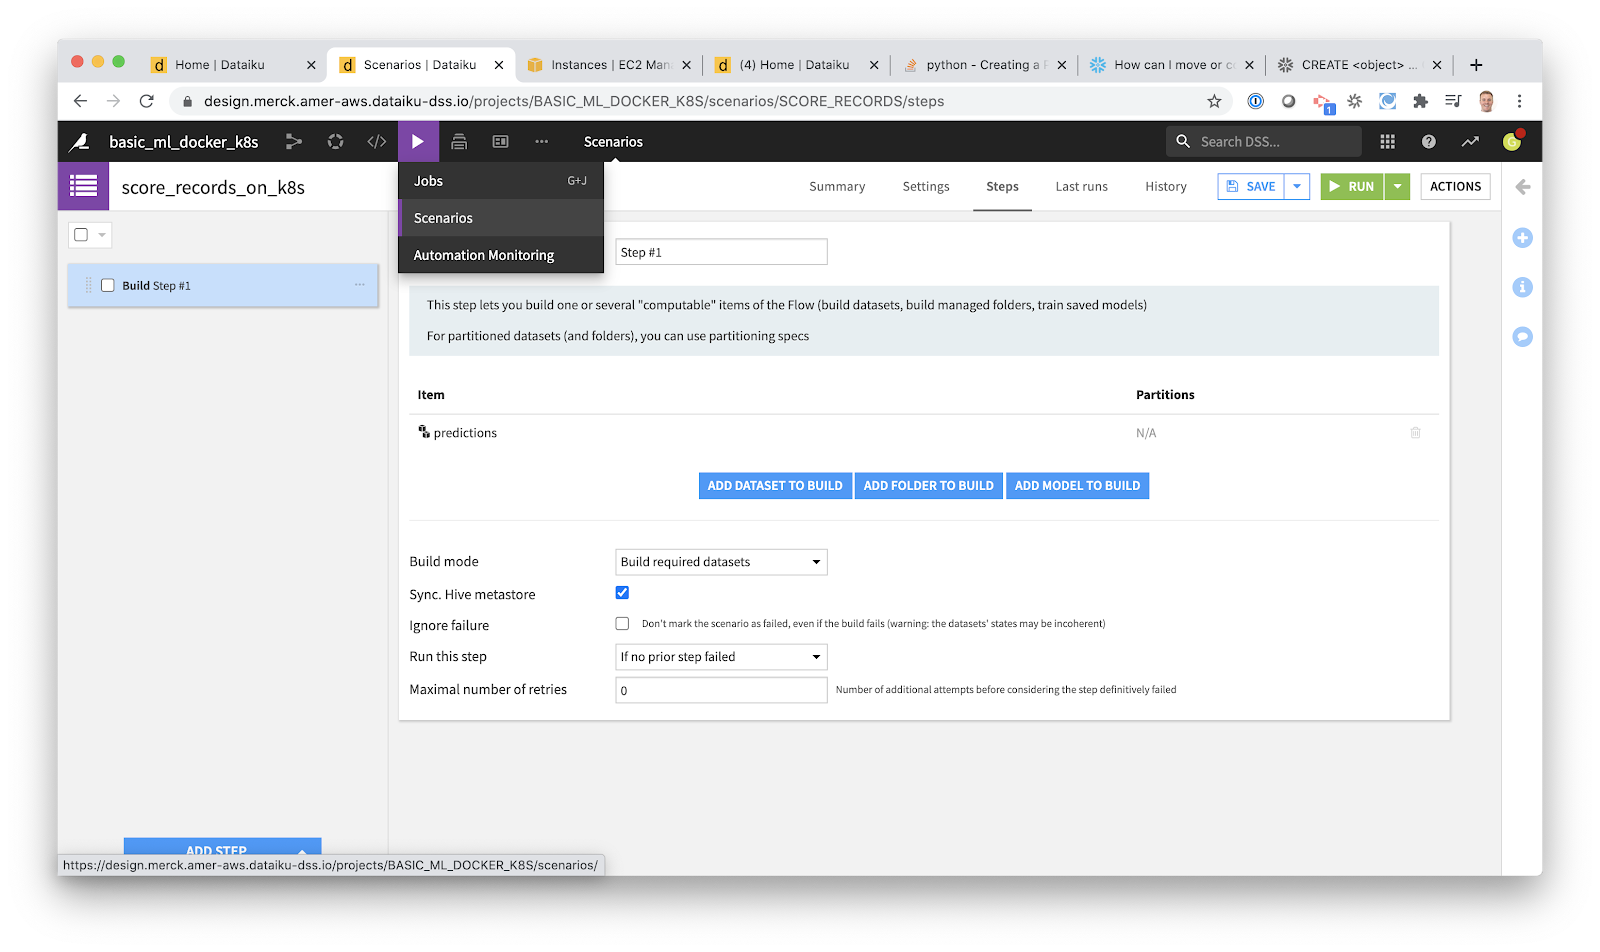
Within our project, I created a new scheduled job. I called this scheduled job “score_records_on_k8s” because that is what it will do. It will build our pipeline, executing our Python tasks on a Kubernetes cluster.
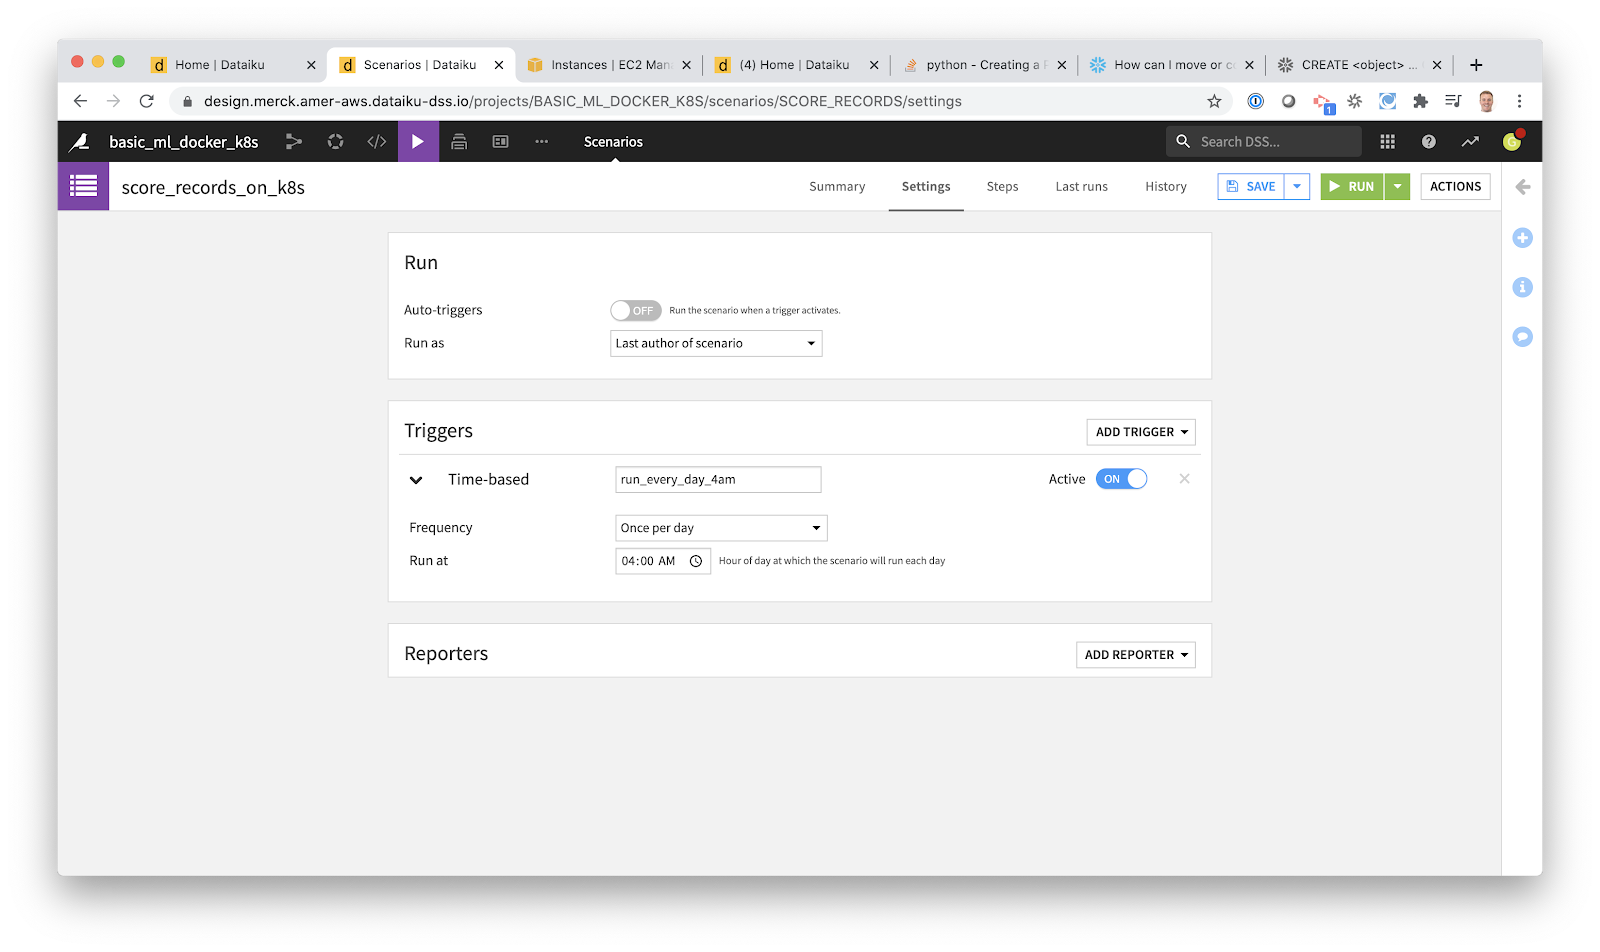
5. Create Trigger for Scheduled Job
Now I just need to schedule when the job should run. Whereas before we used cron syntax, now I can use a friendly GUI.
Here I use the drop-down under Triggers to set up a daily run at 4 a.m. Dataiku supports more complicated configurations, but that is all we wanted for this basic example. Using the green “Run” button I can test my scheduled job whenever I want. And I can easily turn the job on and off using the “ON/OFF” button.
This isn’t meant to be a detailed Dataiku tutorial, of course, but I trust you see the contrast between creating Docker images, containers, writing Kubernetes YAML files, and creating Jobs and CronJobs with the Dataiku approach. If that sounds interesting, drop us a line and say hello. And if not, that’s cool too.