Ever have trouble deciding what to wear in the morning? Well, it may not be a problem for much longer! Thanks to this computer vision-based outfit recommendation system, don’t waste those precious minutes deciding what to wear, let AI do it for you!
This article will cover how I approached building out a fashion recommendation system as well as some basics on how you might approach building a computer vision project with deep learning. This particular system takes separate articles of clothing as image inputs and recommends what it considers to be appealing outfits. It is built from a combination of the following models: a convolutional neural network (CNN) autoencoder, a multi-input CNN, and K-Means clustering. The final user interface is created with a Dataiku application.
Project Overview
In order to begin any machine learning project, we need to start with some data! In this case, I used the Polyvore dataset. Polyvore is a fashion website where users upload images of outfits and each outfit receives likes from other users. The data consists of folders of outfit images as well as JSONs containing metadata for each outfit (i.e., the number of likes that each outfit received and the category of clothing for each component of the outfit).
Since each outfit has a score (the number of likes), we can generate all combinations of outfits in a particular user’s closet, predict the number of likes each outfit would receive, and return the outfit with the highest number of likes as predicted outfit recommendations.
The final project flow is a little more complicated. We can break it down into two general sections:
1. Model Training
- Use the outfit descriptions to extract only the images that match articles of clothing in our definition of an "outfit."
- Train an autoencoder model for each type of clothing in our defined “outfit.”
- Predict embeddings for each input image.
- Train a multi-input CNN to predict the likes for each outfit.
2. Outfit Recommendation
- Input end user wardrobe and predict the embedding for each image.
- Generate all possible combinations of outfits using the images.
- Score each possible outfit using the CNN.
- Create three clusters of outfits based on the embeddings.
- Return the outfit with the top score for each cluster as predictions.
Initial Data Cleaning
The Polyvore dataset includes three JSONs (test, train, and validation) with metadata for each outfit. We can import these JSONs as datasets in Dataiku to obtain the paths to relevant images from each outfit. Because Dataiku automatically handles test/train splits, I combined all the data before cleaning it in a prepare recipe.
In the prepare recipe, I removed all outfits that weren’t relevant to the problem by using the “filter on value” processor. For example, I removed all outfits that contained “A menswear look” in the description to make sure we were only looking at women’s fashion for this project.
Next, I needed to define what I would consider an “outfit.” In this project I considered two basic types of outfits:
Type 1:
- Dress
- Outerwear (optional)
- Shoes
- Bag
Type 2:
- Top
- Bottom
- Pullover (optional)
- Outerwear (optional)
- Shoes
- Bag
I used a series of Python steps in my prepare recipe to remove any outfits that didn’t match the two outfit criteria above. For example, if an outfit contained a dress but no shoes, I would drop it from the dataset. Finally, I created a column containing the path to the actual image for each article of clothing for each outfit, which we can reference to build the models.
Image Processing for Computer Vision
Most machine learning models can only take numerical inputs, so we need a way to convert our .jpg files to a format that a model can read. In this case, I used the Python package OpenCV-Python, which contains pre-built OpenCV with dependencies and Python bindings. OpenCV is an open source library for computer vision, machine learning, and image processing and can be accessed through a variety of different programming languages. OpenCV allows you to read images as bytes in Python through the methods cv2.imread(`image_path`) and cv2.imdecode(`image_path`).
When an image is read into Python, it can be represented as either a 2D or 3D matrix, depending on the number of color channels present in the image. For example, if you have a black and white image that is 200x300 pixels, it will be represented by a 2D array of shape (200,300). Each point on the matrix will be a number from 1 to 255 representing the brightness of that pixel. If you have a 200x300 pixel color image, it will be represented by a 3D array of shape (200,300,3). Each of the channels in this matrix represents red, green, or blue, and each point of the channel will again be a number from 1 to 255 representing the brightness of that pixel.
When working with image data, just like in any other machine learning problem, the data should be normalized. The models that these images will be fed to will need inputs of universal sizes, so I could either resize the images to all be the same dimensions or pad the images to match the size of the largest image. In this case, I started by using another cv2 method to resize all images to the same dimensions. After that, I simply divided the image arrays by 255 so each point would be constrained to a scale from 0 to 1. The images are now ready to be fed into a machine learning algorithm!
Dimensionality Reduction With an Autoencoder Model
Before training the predictive model, I decided to train a model to reduce the dimensionality of the images to feed into concurrent models. This has two benefits: the first is that we can work with smaller representations of images, which increases the efficiency. The second benefit is that the concurrent models can learn additional signals from the autoencoder that the original image doesn’t contain.
So what actually is an autoencoder? It’s a structure used in artificial neural networks type algorithms used to learn efficient codings of data. You can learn more about deep learning here and we have a guidebook on the topic here. While working with neural networks, the modeler defines a variety of layers. In the case of autoencoders, each layer will decrease the dimensionality of the original input up until the smallest layer, which is taken as the encoding of the input.
Then the same process is reversed, increasing the dimensionality up until the output is the same size as the input. The model is actually trying to predict the input (in other words, the target is the same object as the features). Because of this, it’s actually quite easy to visualize how well the model is working. The better the model, the closer the output images will match the inputs.
For this project, I trained a separate model for each article of clothing, so that each model has a general understanding of its specific article. You can see that the model is actually able to generalize the clothing. For example, the sweater model was able to understand what the slouchy gray sweater would look like straight on. This shows how feeding the embeddings into the concurrent models can reduce some of the noise from the variety of input images.
Typically computer vision problems involve neural networks, but not necessarily. You can build decent models using almost any algorithm, even something like logistic regression. In this case, the project is more complex, so I used a series of neural networks. I built the autoencoder with a CNN, since we typically use this type of neural network while working with images. I trained the autoencoder models in a Python recipe and saved the model weights in a managed folder to call them at other points in the flow.
Predict Outfit Scores With a Multi-Input CNN Model
Now that we have the autoencoder model, we can use the encodings to train a predictive model. This model takes separate articles of clothing as inputs and predicts the log likes that outfit would receive. I chose to predict the log likes in this case rather than the actual likes because the distribution of likes was incredibly skewed. Taking the log provides a more normal distribution.
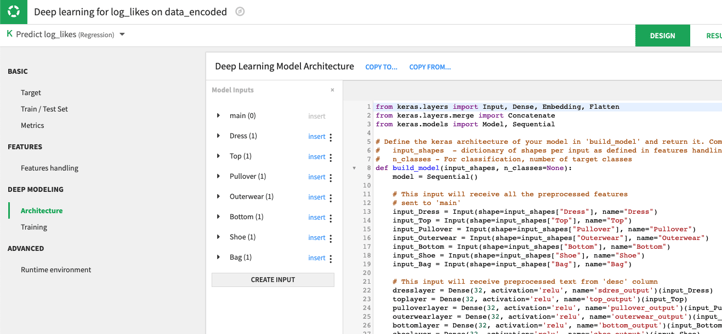
Each image’s encoding was passed individually to fully connected layers before they were all concatenated together and passed through an additional fully connected layer, before predicting the output. In this way, each image was evaluated separately and together as a whole in the outfit.
To train the model, I used the deep learning prediction visual machine learning lab in Dataiku. I was able to use each of my features (each article of clothing) as a separate input and inserted them directly into my model. Once the model was trained, I published it to the flow so I could predict scores on new users’ outfits.
Putting It Together With Clustering Algorithms
Using the trained models, we are finally able to create some new outfit recommendations! Given the new clothing input by the user, the first step was to read the images using OpenCV and then encode them using the autoencoder. After that, I created all possible combinations of outfits using the definition of “outfit” that I defined above. Next, I used the predictive model to predict the score that each outfit would receive. We could stop there and just return the outfits with the top scores. However, when I tried that method, I found that the top outfits were almost all the same with just some variation on the shoes or bag.
In order to ensure that the outfits were relatively different from each other, I decided to cluster the outfits using the embeddings and return the top outfit from each cluster. This is another advantage of using the embeddings, as the dimensionality is extremely reduced for the clustering step. You can learn more about clustering and how the algorithms work here. In this case I used K-Means clustering to find three clusters (for three outfit recommendations).
I created a clustering lab to initialize the settings and deployed the algorithm as a recipe to perform clustering so that each time the flow is run with new images, new clusters will be formed accordingly. After a cluster is identified for each potential outfit, the Top N recipe can be used to find the top scoring outfit for each cluster. Finally, I added the images from each top scoring outfit to a folder using a python recipe. The recommendations are complete.
End User Interface
Now that the entire pipeline was complete, I wanted to build an interface that an end user would actually be able to interact with. Thankfully, using Dataiku applications, this was actually really easy! I started by creating a scenario that could automate the recommendation flow zone (the autoencoder and predictive models don’t need to be retrained to make recommendations). The scenario triggers the recommended outfits to rebuild from the user’s input images onward.
Next, I built a Dataiku application for an end user interface. The end user will be able to drag their photos into the application, click run, and then see their recommendations in a dashboard!
Results and Further Applications
With the application done, we can finally get to recommending outfits and reviewing the model on real examples. I used an assortment of images I found online to test my system, and here were a couple outfits it returned:
This is an unsupervised problem and fashion is pretty subjective, so it’s tough to really evaluate what a “good” or “bad” model looks like. I would say that my measure is whether or not I would personally wear the outfits that the system recommends, which in this case is a resounding yes.
There are many extensions of this project, such as recommending articles of clothing to users to enhance their existing wardrobe or dressing store mannequins. If nothing else, it can at least help you get dressed in the morning when it feels like you have nothing to wear.
